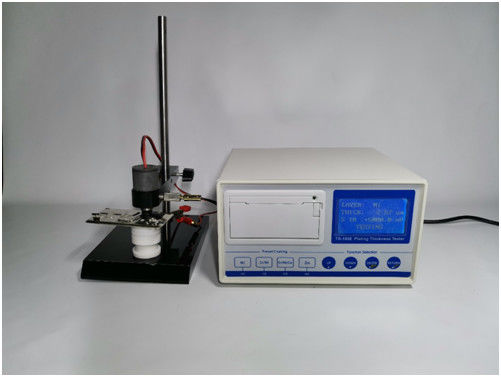
HUATEC TG-100ECoulometric Thickness Tester Metal Coating Thickness Gauge Electrolytic Thickness Gauge Inbuilt Printer
How to select the electrolytic solutions
Designation of electrolytic solutions and deposited metal and base combinations
|
Plating
metals
|
Base |
| Steel |
Copper and its alloys |
Aluminum |
Nickel |
Multi-layer
nickel
|
NdFeB |
| Gold(Au) |
|
A1 |
|
A1 |
|
|
| Silver(Ag) |
A6 |
A7 |
|
A6 |
|
|
| Tin(Sn) |
A3 |
A3 |
|
A3 |
|
|
| Zinc(Zn) |
A8 |
A8 |
A8 |
A8 |
A8 |
A8 |
|
Copper
(Cu)
|
A4 |
A4 |
|
A4 |
|
A4 |
| Nickel(Ni) |
A5 |
A5 |
|
|
|
A10 |
|
Chromium
(Cr)
|
A2 |
A3 |
A2 |
A2 |
A2 |
|
How to measure the plating metals of single layer
Example: The measurement of the zinc plating with white passivation on the steel substrate , it’s thickness is 10μm.
- Use the rubber to wipe away the passivation films on the surface of zinc plating of the article to be measured.
- Depress the testing head vertically on the surface of the article to be measured, applied adequate pressure until without any leakage.
- Electrolytic solution A8 is selected from table 2 for the combination of zinc plating on steel substrate. The cell must be filled with 2 ml of the electrolytic solution by using a dropper. The cell will not be filled full. (The solution level is about 3 mm from the opening of the cell)
- Insert pipette to the bottom of the electrolysis cell, repeat suck several times in order to remove the air bubble from cell, enables the electrolytic solution to contact completely with the zinc plating, before placing the stirrer to given position.
- Depress the Zn button.
- Insert the signal plug into the hole of the screw of the electrode, attach the red signal clip to the plated object and be sure that a proper connection has been done.
- press the measurement button, the stirrer begin rotating, while the buzzer alarms, the measurement will be stopped automatically, the thickness 10 μm has been displayed on the indicator, press the stop button.
- Press the print button to get the list of the measurement results. (if you don’t need the list you can skip this step)
- Raise the stirrer, clean up the used electrolytic solution by using the pipette, rise the testing head, remove the article.
- Clean up the internal surface of the cell and gasket by rinse water and wiping. Be sure that there is not any oxidation products on them before they are replaced back.
Note
When measure the plating of Au or Cr (decorate chromium), depress the T button and the Au or Cr button at the one time.
|
How to measure the hard chromium plating
Example: The measurement of the hard chromium plating on steel substrate , the thickness of the hard chromium plating is 35μm.
- Use the rubber wipe away the passivation films on the surface of chromium plating of the article to be measured.
- Depress the testing head vertically on the surface of the article to be measured, applied an adequate pressure until without any leakage.
- Electrolytic solution A2 is selected from table2, the cell must be filled with 2 ml of the electrolytic solution by using a dropper. The cell will not be filled full. (The solution level is about 3 mm from the opening of the cell)
- Insert the pipette into the bottom of the electrolysis cell. Repeat suck several times, in order to remove the air bubble from the cell, enables the electrolytic solution to contact completely with the chromium plating.
Note: When measuring the chromium plating placing the stirrer is not a requirement.
- Depress the plating of Cr select button and the Cr measurement button. (the plating of Cr select button: --- measure the decorate chromium --- measure the hard chromium)
- Insert the signal plug into the hole of the screw of the electrode, attach the red signal clip to the plated object and be sure that a proper connection has been done.
- press the measurement button, the stirrer begin rotating, when the thickness of 15μm shows on the indicator press the stop button then press the print button(if not the tester could not work normally), renew the electrolytic solution, again press the measurement button. Renewal of the electrolytic solution should be made at frequency of even 15μm until buzzing. Record the thickness of the hard chromium plating.
- Clean up the used electrolytic solution by using the pipette. Rise the testing head. Remove the article.
- Clean up the internal surface of the cell and gasket by rinse water and wiping. Be sure that there is not any oxidation pro ducts on them before they are replaced back.
How to measure the multi-layer plating
Example: The measurement of the thickness of the multi-layer deposits consisting of copper,nickel and chromium plating on the steel substrate . The thickness of the component layers is 0.4μm of chromium, 14μm of nickel, 10μm of copper.
- Use the rubber wipe away the passivation films on the surface of plating on the article to be measured
- Depress the testing head vertically on the surface of the article to be measured, applied an adequate pressure until without any leakage.
- Electrolytic solution A2 is selected from table2, the cell must be filled with 2 ml of the electrolytic solution by using a dropper. The cell will not be filled full. (The solution level is about 3 mm from the opening of the cell)
- Insert the pipette into the bottom of the electrolysis cell. Repeat suck several times, in order to remove the air bubble from the cell, enables the electrolytic solution to contact completely with the chromium plating.
Note: When measuring the chromium plating placing the stirrer is not a requirement.
- Depress the T & Cr measurement button.
- Insert the signal plug into the hole of the screw of the electrode, attach the red signal clip to the plated object and be sure that a proper connection has been done.
- Press the measurement button, the stirrer begin rotating, while the buzzer alarms, the measurement will be stopped automatically, the thickness of 0.4μm has been displayed on the indicator, repeat press the measurement button 1~2 times, and buzzing before pressing the stop button. Record the thickness of the chromium plating (the measurement values is based on the values obtained from first buzzing).
- Clean up the used electrolytic solution by using the pipette without rising the mount of the cell. Rinsing the cell 1~2 times with deionization water before filling the cell with 2ml of the electrolytic solution A5 (refer to Table 2, the electrolytic solution A5 for nickel plating on copper substrate), and then placing the stirrer to giver position.
- Repeat the step 7 as above and record the thickness 14μm of the nickel plating.
- Repeat the steps 7, 8 as above and record the thickness of 10μm of the copper plating.
- Clean up the used electrolytic solution by using the pipette. Rise the testing head. Remove the article.
- Clean up the internal surface of the cell and gasket by rinse water and wiping. Be sure that there is not any oxidation products on them before they are replaced back.
The formulations and preparation methods of the electrolytic solutions
Requirement: The electrolytic solution requires preparation from the analytical pure grade of the chemicals and the distilled water.
| Symbol |
Name |
Molecular formula |
Preparation methods |
| A2 |
Phosphoric acid |
H3PO4 |
Use water to dilute 127ml H3PO4 to1000ml. |
| A3 |
Hydrochloric acid |
HCl |
Use water to dilute 175ml HCl to 1000ml. |
| A4 |
Ammonium
nitrate
|
NH4NO3 |
Use water to dissolve and dilute 800g
NH4NO3, 10ml NH3·H2O to 1000ml.
|
|
Ammonia
aqueous
|
NH3·H2O |
| A5 |
Ammonium
nitrate
|
NH4NO3 |
Use water to dissolve and dilute 400g
NH4NO3 40g NaSCN to 1000ml.
|
|
Sodium
thiocyanate
|
NaSCN |
| A6 |
|
NaNO3 |
Use water to dissolve and dilute 5ml HNO3, 100g NaNO3 to 1000ml. |
| Nitric acid |
HNO3 |
| A7 |
Potassium
thiocyanate
|
KSCN |
Use water to dissolve and dilute 180g KSCN to 1000ml. |
| A8 |
Sodium chloride |
NaCl |
Use water to dissolve and dilute 100g NaCl to 1000ml. |
| A1,A10 |
|
At present, those formulations not been published, for purchase. Please contact with us |
FEATURES
- Permits measurement of thickness of single layer of electroplating metals
- The preset standard plating types are: decorative chromium, hard chromium, nickel, copper (copper on iron or non-metallic substrate), zinc, tin, silver, and gold 8 plating types. If you want to test other plating types, you must modify the preset plating types. For example, if you need to test electroless nickel (customers may not test silver), you can change silver to electroless nickel.
- Permits measurement of thickness of individual layers of multi-layer electroplated coatings
- Permits measurement of thickness of electroplated coatings on non-conducting materials such as plastics
- Digital display permits easy and accurate direct readings of measured thickness in the decimal system
- Equipped with a miniature printer, which can automatically print plating species, thickness and test time
- Potential difference cannot be measured
- Designed for use in accordance with the standard testing procedures conforming to the ISO Specification
SPECIFICATIONS
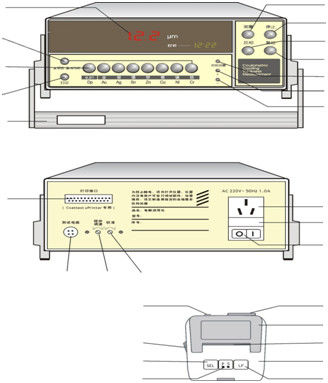
Model: TG-100E
Power supply: AC 220V±10%, 50~60Hz
Power consumption: Not more than 25 W
Gross weight: About 9 kg
Size of package: 370×440×230(mm) for the tester body
Measurement range: 0~50μm error: ≤±10%
Detailed list:
TG-100E tester body 1
Potential testing stand 1
The signal cable for potential transducer 1
Electrolysis cell 1
Gasket 1
Electrolysis solutions A2, A4, A5, A8 1
Rubber 1
Portioning bottle 2
Nipper 1
Instruction, guarantee card 1
Inspection prior measurement
1. Place the tester, testing stand and the stand of the chemicals on the working desk in even and straight.
- Be sure that the power supply is AC 220V.
- Connect the tester to testing table using cables.
- Depress any select plating button, short out the signal clip to the terminal of signal plug, turn on the power switch and then depress the measurement button, the stirrer should rotate and the displayed begin to count. Disconnect the connecting line between the signal clip and the terminal of signal plug, the tester should immediately stop to count and alarm. Thus the condition of the tester can been considered as normal.

 Your message must be between 20-3,000 characters!
 English